
Introduction
I have tinkered with car stereos since I was in my teens installing first into my parents’ and friends’ cars and later my own. In my last few cars I’ve had varying degrees of install ranging from adding small under-shelf amps to building custom, leather-covered door pods for speakers in an Impreza and fitting a double din satnav, phone kit and sub to an MX5.
After buying this car in 2011, I knew I wanted to go all out and take this to what, at least for me, was a whole new level. I perhaps did not appreciate just how much work that would mean.
In this part of my site, I’ll try to cover all of what I did and hopefully pass on information that may be useful for anyone attempting a similar project.
Objectives
The car came with a basic (RCD310) VW stereo installed. I knew I wanted to upgrade this to something with satnav and integrated phone features and so on.
I also wanted the sound to be the best I could achieve for a reasonable budget and also chose to the install to be as stealthy as possible. This was about enjoyment of great sound (I am a music and hi-fi fan at home) whilst keeping the car usable and not drawing attention to itself for security.
The Plan
The diagram below shows an overview of the system as installed. There are links below to all the detail.

Head Unit
After looking at aftermarket alternatives (I’ve previously used Kenwood and Alpine head units), I realised that I needed to stick with a VW head unit to keep the best integration with the car. This was for things like the steering wheel controls, display of audio information on the instrument panel multifunctional display (MFD) and display of things like climate control information on the head unit display.
[Today there are some options available from aftermarket manufacturers that claim to enable some of these things, but those were not available at the time.]
The RNS510 was the best factory head unit offering dual din, touch screen, CD/DVD, satnav, Bluetooth integration and a hard drive for satnav maps and music. My car already had a “multimedia device interface” (MDI) under the armrest. That allowed connection to the existing head unit (or an RNS510) for 3.5mm analogue audio, iPod/iPhone and USB.

Digital Signal Processor (DSP)
I decided to use a DSP between the RNS510 and the amplifier(s). This would provide the best capabilities for tuning the sound. I’ll discuss that in more detail in that section.
After looking into this for some time, I decided to go with an Audison processor (the Bit Ten D).

Perhaps the biggest decision (and not in my mind when I started out) was to go for an “active” install.
“Active” means that each speaker driver gets its own amplification. In a normal “passive” installation, the amplifier connects to a crossover which splits frequencies to, say, a tweeter and a mid-bass. That’s a fixed split decided by the manufacturer. In an active install , the digital signal processor does this and allows for adjustment and tuning suited to the car.
That came about partly because the processor was designed for this and I would have been wasting its capabilities if I had not gone this route. But it also had the potential to enable much higher sound quality and customisation/personalisation of sound compared to a passive install.
We’ll come back to the additional build, setup and tuning complexity this adds later.
Speakers
With the active install chosen, it would have been logical perhaps to look at subwoofer design and equipment choice, but around this time, a car audio shop not far away was having an open day.
While there I managed to try out various front speaker and amplification options and learn a bit more about them. I decided to go with Hertz speakers and a Hertz amplifier to handle the front speaker active channels.

The car actually now has Audison drivers up front replacing the Hertz – I’ll go into why and details of both in that section of the build.
Amplifiers
I chose a Hertz amplifier at the same time as the front speakers. This powers the mid-bass drivers and tweeters up front. I already had a Rockford Fosgate amplifier which I’d used previously. It is such a good amplifier that I decided to go with it again.

Boot Build
Subwoofer choice and the enclosure design came a bit later and turned into a large project of its own. I’ll cover that in detail as there’s a lot to talk about and I’m quietly proud of what I achieved and learned.
The summary is that I managed to include a correctly sized sealed enclosure for a 12” sub while still retaining the spare wheel and allowing easy, quick removal of the sub enclosure if extra space is needed.
The boot build also had to include somewhere for the amplifiers and to keep cabling etc tidy.
Sound deadening etc
Cars are difficult places to try to get good sound because they are:
- A noisy environment – sound has to compete with engine, wind and tyre noise.
- It’s impossible to sit in a good position relative to the speakers as you would with a home hi-fi*
*unless you have a McLaren F1 or Gordon Murray car…

- Cars are full of bits which vibrate and resonate; either from road and other noise or because you have just installed big speakers in them. How many high-end speakers do you know made from thin sheet steel?
These need to be addressed to get reasonable sound.
I have done a lot of work (mostly now hidden behind trim) to deaden relevant panels. This is mainly shown throughout the other sections (e.g. door speaker installs).


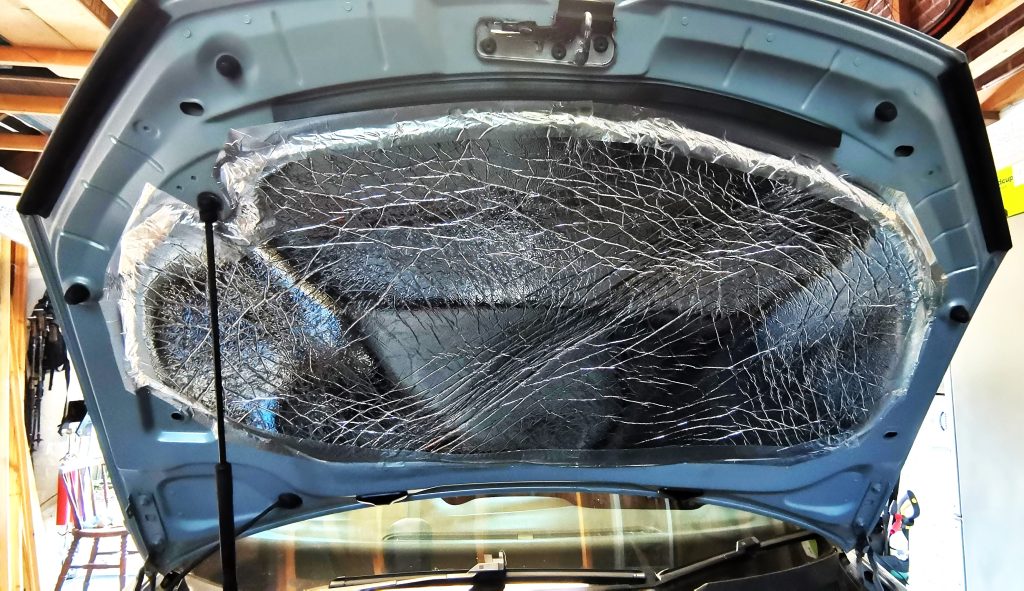
You can see how I deadened and added noise insulation to the bonnet in detail here.
Setup and tuning
I was accustomed on previous installs to perhaps using a graphic equaliser to adjust sound a little. Compared to the install in my Golf, that’s like the difference between making a paper plane and building, programming and flying an autonomous drone.
You may not want to go down this rabbit hole, but if you do, I’ll try to explain what I learned along the way.
Suffice it to say it involved also equipping myself with a calibrated microphone, sound interface, software and trying to learn enough about sound to get a reasonable result. Turns out sound is complicated….who knew?

Issues and Learnings
Have there been issues with the system? I have been pleasantly surprised that there have not aside from:
- One mid-bass speaker failed – unknown reason. Replaced front speakers in 2019.
- The DVD/CD drive in the RNS510 developed an issue (I think possibly caused by a laser cleaning disc which it did not like). Replaced with a new drive unit.
- DRC display failing pixels (worse in colder weather) – typical for a vacuum fluorescent display – fortunately the display is not needed to use the DRC.
- Power cable poor connection
The last one of these was at the distribution block in the boot. The cable became slightly loose in the block as it was bare stripped copper compressed by a screw. Such connections can become loose over long periods as the copper migrates.
I addressed this by:
a) adding crimped ferrules to all such connections everywhere (i.e. including all the amplifier outputs as well).
b) replacing the power distribution blocks with higher grade items.
I have made some improvements also over time. For example, I originally used screws in the boot build (e.g. where cables are clipped in on the baseboard). Screws directly into MDF do not provide a reliable long-term solution.
These probably would have been OK because they are not under load. But I wanted the install to be high quality throughout. I changed all of these to use nutserts with stainless steel bolts for a very reliable, robust finish.


Recent Comments